
Skip ahead!
If you’re an angular developer, you’ll almost certainly run in to ngrx at some point as the knowledge you have in your domain grows. State management? I hear you ask - why do I need that?
Well, I had the same questions. They are certainly valid questions to ask, as NgRx is not a one-size-fits-all solution.
But we can assume today that you’ve found yourself reading this article because you want to learn more about it, or you’ve started trying to wrap your head around it, and all the new terminology is frying your brain. Well, do not fear. This article comes from me, a guy who has only been using ngrx for a few months, and therefore I hope that I have not forgotten my roots: a developer intimidated by the thought of NgRx.
The flow
One of the reasons that NgRx can be so intimidating is that it will potentially bring about a completely different flow to your application. When used correctly, it takes away logic from your components, keeping them simpler to extend and easier to understand.
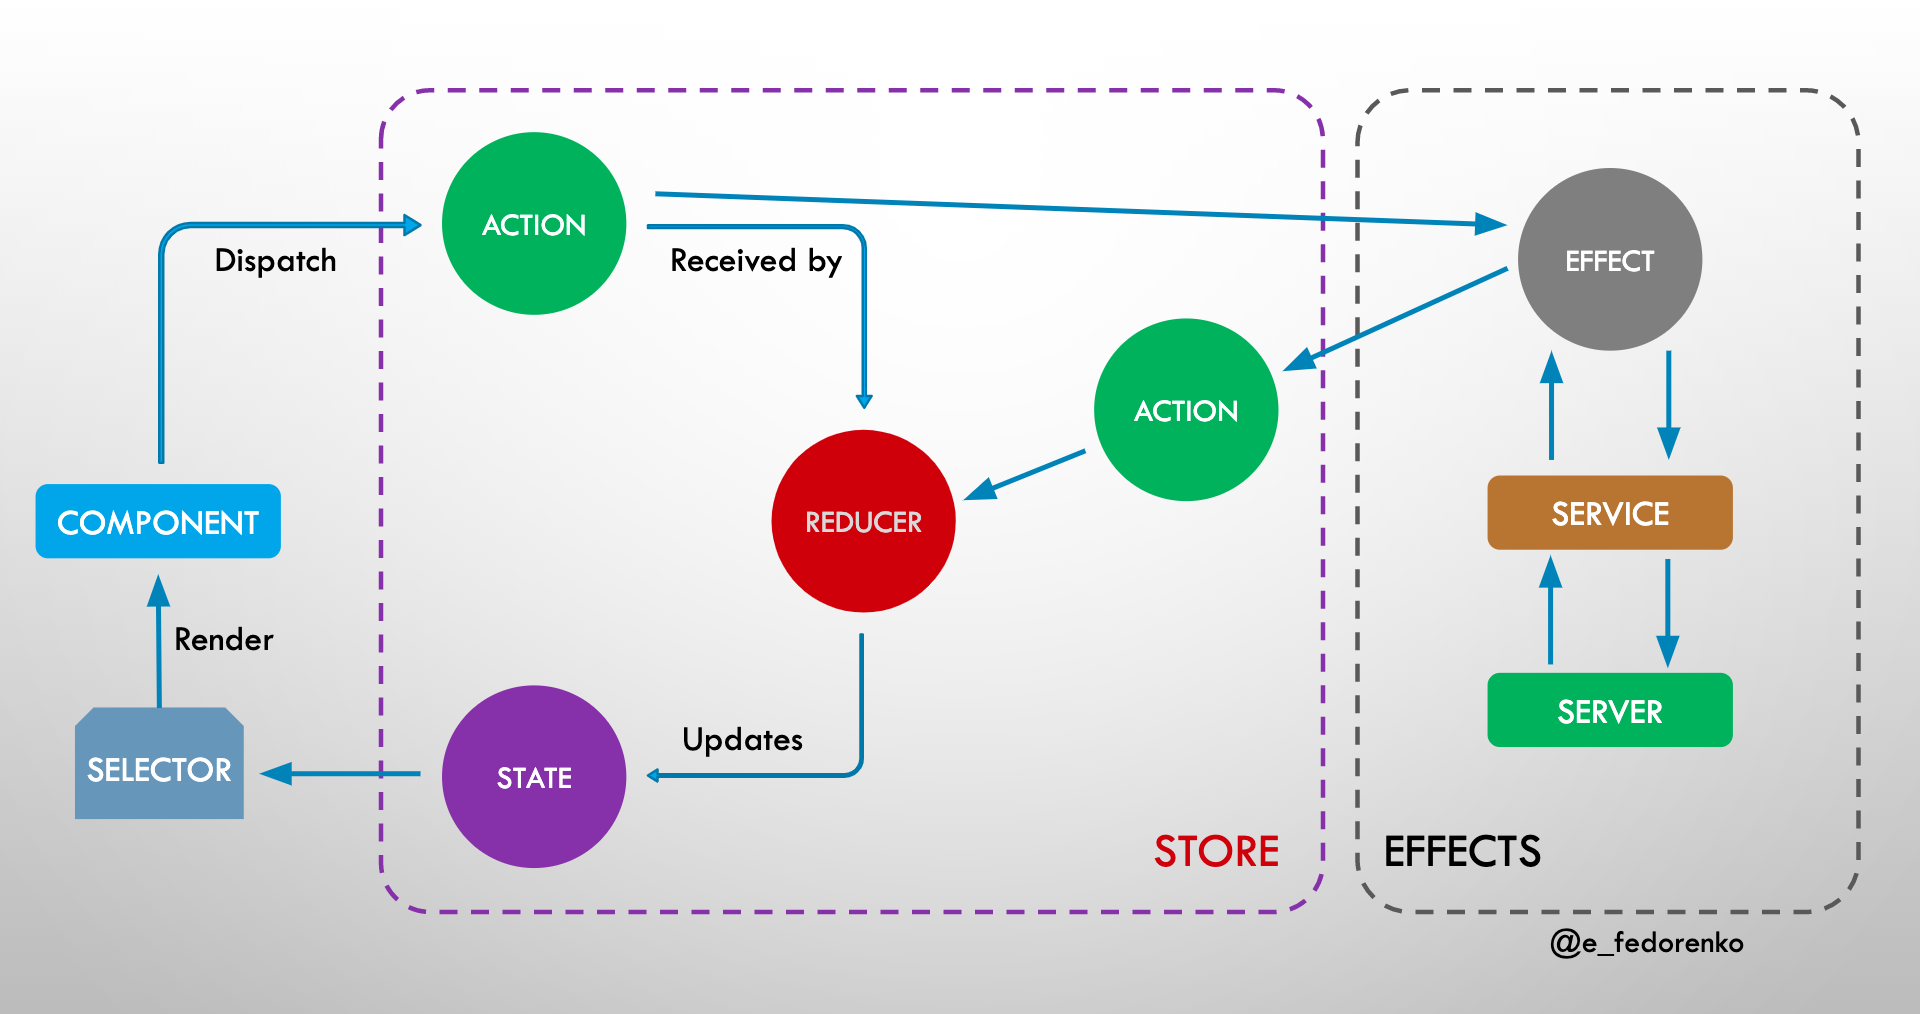
In a component, let’s say you want to fetch a list of to-dos. You would first trigger an action, fetchAllTodos. You dispatch this action to the store. Something, somewhere (an effect) is listening for this action, and fetches a list of to-dos from an API. On success, another action is triggered, fetchAllTodosSuccess, which triggers an event in your reducer, which uses a defined function to integrate that API response in to your existing state.
After the new state is integrated, you need to get that state in to your component. You do this by using a selector to select a slice of your state as an observable. Finally, either by using an async pipe or subscribing, you now have that state ready to be displayed.
Actions
Actions are where pretty much every flow starts. An action can be things such as setHeaderTitle, fetchTodos or fetchTodosSuccess. You can think of actions as triggers. You use them to trigger either a reducer or an effect, which we will move on to shortly.
You typically define your actions in a dedicated file for that scope, e.g. todo.actions.ts.
Defining an action
You define an action with the following syntax.
todo.actions.ts
const fetchTodos = createAction('[To-dos] Fetch todos');

export const TodoActions = {
  fetchTodos
};
An action can optionally pass along a payload, like so:
core.actions.ts
const setHeaderTitle = createAction(
  '[Core] Set header title',
  props<{ title: string }>()
);

export const CoreActions = {
  setHeaderTitle
};
The magical props function is what you use to set interface for the payload of each action. For this action, the payload is the page title.
For our first action, we will listen for it in an effects file - effects files are used when information needs to be fetched from outside our store, or when we want to have side-effects from our actions.
For our second action, we will listen to that in a reducer file. A reducer is a set of functions that take the payload of an action and slots it in to our central store of data.
Dispatching an action
To dispatch an action, you inject the store in to your component and call the dispatch method with your action.
todos-page.component.ts
export class TodosPageComponent {
  constructor(private store: Store) {}

  ngOnInit(): void {
    this.store.dispatch(setHeaderTitle({ title: 'Todos' }));
  }
}
Effects
Effects are used when we need some data from an external source, such as an API. It can also be for triggering other things in our application as a side-effect of actions, such as displaying a toast message when a todo has been deleted.
Effects are stored in a normal injectable class, meaning that you can inject your http service to fetch data.
A typical effects file will start off looking something like this:
todo.effects.ts
@Injectable()
export class TodoEffects {
  constructor(private actions$: Actions, httpService: HttpService) {}
}
You register your effects by importing the following in to a module:
root-store.module.ts
imports: [EffectsModule.forRoot([TodoEffects])];
Creating an effect
In order to fetch our todos, we need to register an effect in our newly created TodoEffects.
todo.effects.ts
@Injectable()
export class TodoEffects {
  constructor(private actions$: Actions, httpService: HttpService) {}

  fetchTodos$ = createEffect(() =>
    this.actions$.pipe(
      ofType(TodoActions.fetchTodos),
      switchMap(() =>
        this.httpService
          .get('todos')
          .pipe(
            map((response) =>
              TodoActions.fetchTodosSuccess({ todos: response })
            )
          )
      )
    )
  );
}
I appreciate that the screenshot above just chucked a few new things at you, so lets go through each bit.
- ofType: We pass the action that we want to listen to in here. This effect is now listening out for when this action is triggered.
- switchMap: Because we will be using observables from the
httpService, we will be using a switchMap here to process our observable. - map: We use the RxJS map in order to take the response from our http call and return an action:
fetchTodosSuccess.
Non action-triggering effects
Typically, you return an action from an effect. However, you don’t have to. Take this example for instance:
todo.effects.ts
@Injectable()
export class TodoEffects {
  constructor(private actions$: Actions, popupService: PopupService) {}

  deleteTodoSuccess$ = createAction(
    () =>
      this.actions$.pipe(
        ofType(TodoActions.deleteTodoSuccess),
        tap(({ todoName }) =>
          this.popupService.show(`Your todo ${todoName} has been deleted.`)
        )
      ),
    { dispatch: false }
  );
}
Notice the addition of { dispatch: false }. This means that ngrx will not be listening out for any actions returned by this particular effect.
Reducers
Now that we’ve got the list of todos from our API, we need to process them so that they can fit in to our centralised state. That’s where reducers come in.
Declaring our state
When creating a reducer, we must first declare an interface for the shape of our state.
todo-state.model.ts
export interface TodoState {
  list: Array<Todo>;
}
Then we can generate our initial state. In this case, we will just have an empty array for the todos.
todo.reducer.ts
const initialState: TodoState = {
  list: []
};
Listening out for actions
Underneath our initial state declaration, we create the reducer.
todo.reducer.ts
export const todoReducer = createReducer(
  initialState,
  on(TodoActions.fetchTodosSuccess, (state, action) => {
    return {
      ...state,
      list: action.todos
    };
  })
);
We first pass in our initial state. After that, we use on to listen to particular actions, and then use a callback function that has the current state object and the action as parameters. Whatever we return from this function will become the new state.
We can declare as many listeners in this reducer as we want, simply by adding more on() functions after the one we have already set.
Hooking it up
To hook our reducer up to the shared store, we need to import another module with a map of our apps reducers in to whichever module you are using for your store items.
root-store.module.ts
imports: [
  StoreModule.forRoot({
    todo: todoReducer
  })
];
Selectors
Finally, we have reached the end of our store flow. We’ve fetched our todos and integrated them in to the store - now all we have to do is use them in our components.
Creating a selector
Selectors are just defined functions. We define these functions in order to decide what gets extracted from the store.
todo.selectors.ts
const todos = (state: RootState) => state.todos.list;

export const TodoSelectors = { todos };
In the above snippet, we’ve used RootState as an interface for our overall store - this will match the object that you pass in to StoreModule.forRoot() in our module.
For this selector we first go in to the todos state, and then select the list field from our interface defined further up in todo-state.model.ts.
We then export all selectors from the file in one object, to make it easy to import them when using them elsewhere.
Using a selector
We can now select the todos list from our store, from within any component that we want.
todos-list.component.ts
@Component({
  selector: 'app-todos-list',
  template: `
    <app-todo *ngFor="let todo of todos$ | async" [name]="todo.name"></app-todo>
  `
})
export class TodosListComponent {
  public todos$: Observable<Todo[]>;

  constructor(private store: Store) {}

  ngOnInit(): void {
    this.todos$ = this.store.select(TodoSelectors.todos);
  }
}
The great thing about using NgRx is that because it uses observables, our state will always be in sync. In the future, if we have more actions that eventually modify the todo state, the component declared above will always receive the most up to date version of the todos in the store - thanks to the reactiveness of RxJS.
Wrapping up
I’ll be honest, I wrote this article because when I was learning NgRx every article seemed like incomprehensible jargon. I’ve now come to the realisation that the reason for that is that it’s pretty hard to sum everything up about NgRx in one small article, and there is a lot of new stuff to pick up.
Regardless, I hope this article is able to explain some concepts to you in a way that helps you understand NgRx better today than you did yesterday.
Happy coding! ❤️